Make Partition Bootable in Windows 11, 10, 8, 7 Using Diskpart or CMD


In any case, if the partition contains bootable data, sometimes the system may fail to detect it as a suitable partition. This is due to the fact that, to be recognized by the PC as a bootable partition, the partition does not require a bootable environment, it only needs to be marked as an active system partition. Users can add the active marker to the hard drive partition using Diskpart, a command-line disk management application built into Windows. Therefore, in the upcoming section, we are going to discuss a manual procedure to understand how to make partition bootable in Windows 11, 10, 8, and 7. Before that, let us know about the boot partition in a clear way.

What is a Boot Partition?
For Windows OS, including XP, Vista, 7, 8, 8.1, 10 or 11, a boot partition is a partition that holds necessary files. In fact, the boot partition is also considered a boot volume. Whenever users install other operating systems, e.g., Windows Vista, if they already have Windows XP installed or if Ubuntu already installed Windows Vista, then they must contain two partitions, i.e., a dual-boot or multi-boot configuration.
Use Better Partition Data Recovery Software
Create a boot partition that typically contains data lost from your hard drive. Improper use can damage or format your hard drive, making your data inaccessible. Also, there is no real backup before booting the partition. In this case, you will need a powerful Hard Drive Deleted Data Recovery to recover lost data.
We are all aware of the importance of data, so it is highly recommended that you first save your data and then perform steps to make bootable partition in Windows 11, 10, 18, and 7. The program automatically detects free partitions after scanning the disk. In many cases, when data has been permanently deleted, this software can also recover deleted files from a Seagate external hard disk drive.
- Download the Hard Drive Recovery Tool.
- Select the partition and click Scan.
- Browse the recovered data files and folders.
- Save all the recovered files to a location of your choice.
Manual Methods to Make Partition Bootable in Windows 11, 10, 8, and 7
Perform the methods to create partition bootable in Windows 10, 8, and 7 either using the command prompt (CMD) or diskpart.
Method 1: Make Bootable Partition Using Diskpart
- First of all, boot into Windows 10
- Open Start Menu and type diskmgmt.msc to access Disk Management
- Click the OK button or press Enter key
- Check if you have unallocated space on the hard disk. If so, then right-click on the unallocated space and click New Simple Volume. If you do not have any unallocated space, you can shrink the volume Windows 8 already uses. For this, right-click on volume and click Shrink Volume.
- Continue with instructions to accomplish the process
Method 2: Make HDD Partition Bootable in Windows Using CMD
Go through the following steps to make bootable partition in Windows 10 using the command prompt:
- Open the Windows screen and after that, type cmd. Right-click on Command-Line Prompt and choose Run as administrator
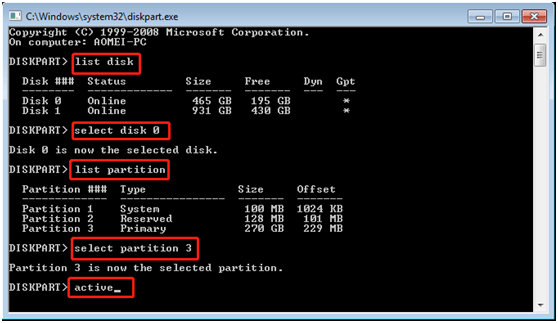
- Now, type diskpart and press the Return key. Now, Diskpart will launch. When Diskpart is active, the traditional command prompt will be replaced by Diskpart prompt, and a command you enter will be processed by an application
- Enter the list disk and again, press the Return key. You have noticed that the number assigned to a drive that contains a partition you want to make bootable. You can find that particular number in the first column
- Mark select disk X, replacing X with the number assigned to a suitable drive. Now, press Enter key
- Type list partition and press the Return key. Consider the number assigned to a partition that you wish to make bootable
- Enter the selected partition X, replacing X with a total number of the partition you wish to select. Press the Enter key.
- Type active and press Return key to require Diskpart to mark that bootable partition as active
- In the end, select Exit, followed by the Return key, to close the disk partition. Now, you can close the Command Prompt window
Method 3: Make Partition Bootable in Windows 11
If there is a problem with your boot partition, you can repair it. However, if not, you can still create a new one. Just follow the instructions below:
- To start your computer, you must use a Windows installation disk or recovery disk. To do this, press Shift+F10. Now you can easily access the command prompt.
- Enter the command line below. This way, you can shrink the partition and get enough unallocated space.
- disk part;
disk shape; - Select drive x (x represents the number of disks to be replaced)
name separation; - Select divide n (n represents the number of units to be reduced)
- Required deduction = 500 (partition reduced by 500 MB)
- You can create a partition using unallocated space using the following command:.
- Create partition size efi=200;
- fast format fs=fat32 tag=”system”;
- Create a partition with size msr = 1128;
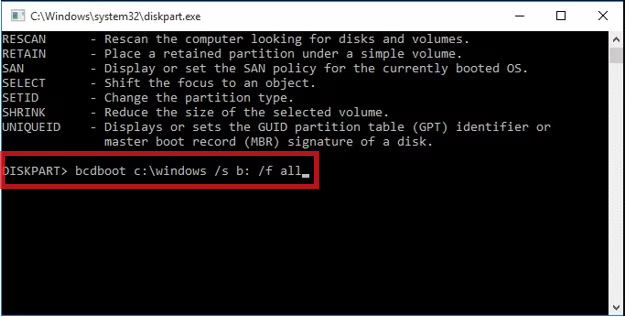
- Wait until the two partitions are created and then enter the following command:. They will help you install the launcher and other necessary programs.
- Boot repair/boot repair;
- bcdboot c:\Windows /s b: /f all
Now you can restart your computer and see if the problem with your Windows 11 partition is resolved.
Time to Conclude
In this blog, we have discussed a step-by-step procedure to make a bootable partition in Windows 10 and 11 manually. But before implementing the manual solution to make partition bootable in Windows 11, 10, 8, and 7,. First, secure your data.
