How Do I Enable Disk’s Controller in The BIOS Menu Computer?


Are you still facing the enable disk’s controller in the BIOS menu computer issue? Not able to understand what to do and how to enable disk controller in bios menu gigabyte? Do not worry; you landed on the right page. In this blog, we will discuss different ways to ensure that the disk controller enabled in bios menu.
User Query
“I have a desktop to which I added a PCI-based raid controller card as well. The BIOS displays the card and I was able to configure Raid 1 without any issue. But when I tried to install Windows 11, 10, 8, and 7, I got an error message: “Windows cannot be installed on disk. This system’s hardware may not support booting to a disk. ensure that the disk controller is enabled in the computer BIOS.” So, could you please help me fix the issue of how to enable disk controller enabled in the BIOS menu? Your help would be greatly appreciated.”
Data Loss Solution: Expert Suggestion
There might be an instance wherein the drive gets corrupted or formatted while enabling the disk controller in BIOS. Therefore, to resolve all such issues, one can use Hard Disk Deleted File Recovery. It is a simple and reliable solution that helps to recover all deleted files from the HDD.
It is not the solution for your main concern on how to enable disk controller in BIOS Windows and all brands of hard drive like Asus, Acer, Sony Vaio, Dell, Samsung, etc. this is the best option to get rid of all types of data loss issues without any hassle. It also fixes external hard drive not showing up in disk management in Windows 11, 10, 8, 7, etc.
Manual Way to Enable Disk’s Controller in the BIOS Menu
There are multiple ways to enable AHCI mode for SATA on PCs where Windows is already installed, and that normally run after this operation. then have a look at the steps to solve your query on how to enable the disk controller in the bios menu in Windows 11, 10, 8, and 7:
Enable Disk Controller via Registry Editor
- First of all, run the Registry Editor
- For this, press Windows + R and type Regedit in the command line box
- Go to this section HKEY_LOCAL_MACHINE\ SYSTEM\ CurrentControlSet\ Services\ iaStorV
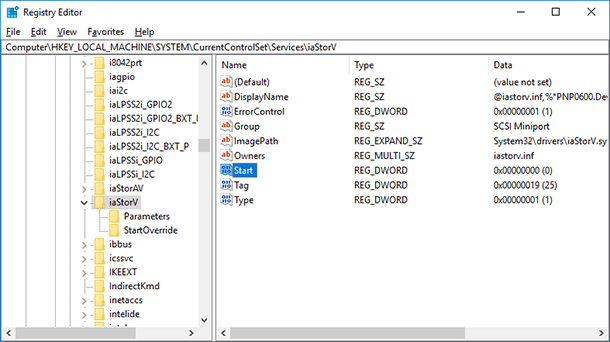
- Double-click on the Start icon and set its value to zero.
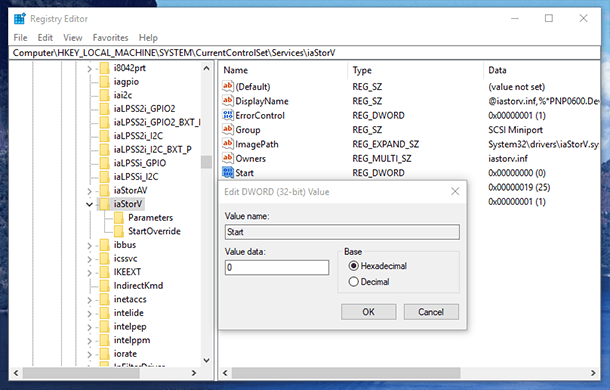
- In the upcoming section, HKEY_LOCAL_MACHINE\ SYSTEM\ CurrentControlSet\ Services\ iaStorAV\ StartOverride set zero value for element 0
- In this section, HKEY_LOCAL_MACHINE\ SYSTEM\ CurrentControlSet\ Services\ storahci set some values to zero for the Start element.
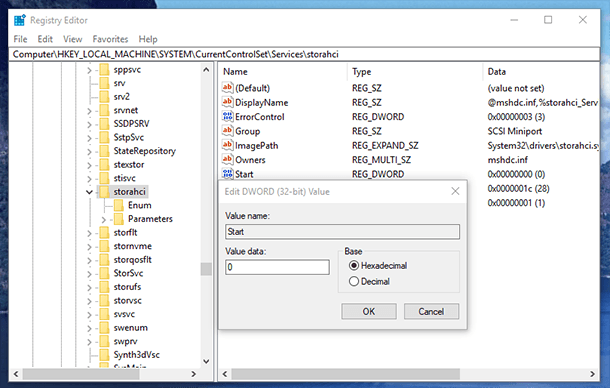
- After that, subsection HKEY_LOCAL_MACHINE\ SYSTEM\ CurrentControlSet\ Services\ storahci\ StartOverride sets a zero value for element 0.
- In this case, there is nothing to be seen, but you can see that AHCI may not be enabled yet.
- Close the Registry Editor
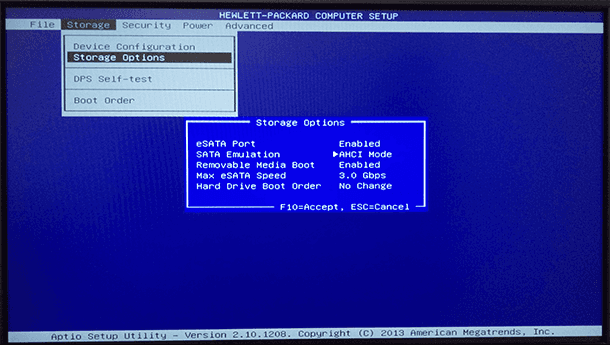
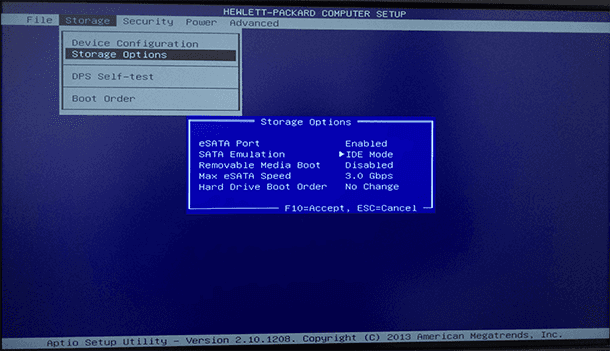
- Restart the system and go to BIOS or UEFI. For the first time after a restart, it is always better to boot Windows in safe mode
- In BIOS or UEFI, find SATA settings to choose the particular mode for memory devices. Switch all of them to AHCI, save settings and restart the PC
- After restarting, Windows can start the installation of SATA drivers, and when it gets over, it will ask for another restart. To do so, users will enable the AHCI mode in Windows. (If the above method does not work properly, here is another solution. To initiate, if users have problems with booting Windows in AHCI mode, return to IDE and restart the desktop, After doing this:)
- Start the Command prompt as an Administrator
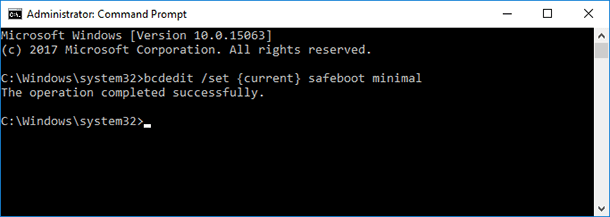
- Type “bcdedit /set {current} safe boot minimal” in the command prompt and press Enter key
- After getting a message that the operation successfully completed, restart the computer system
- Before booting the system, enable the disk controller enabled in BIOS menu or UEFI using the above method and save the settings
- The PC will only boot up in a safe mode and install all required drivers.
- Again, launch the Command prompt as Administrator and type in bcdedit /deletevalue {current} safeboot
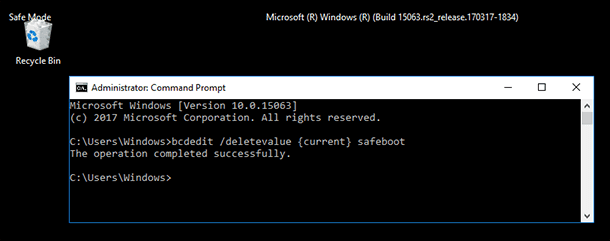
- Once the command is executed, restart the PC again. This time, Windows needs to boot with AHCI enabled and without any restrictions.
Well, these instructions can theoretically result in unintended consequences, like the inability to start the operating system. Moreover, this method requires technical skills and knowledge to accomplish the task. Here is the solution to your query. How do I ensure that the disk controller is enabled in the computer BIOS?.
Time to Conclude
At certain times, some users fail to ensure that the disk controller is enabled in the computer BIOS. This situation occurs due to several reasons. Therefore, in this blog, we have discussed a manual procedure to enable disk controller in bios menu. Otherwise, users can opt for a reliable third-party tool, listed above, if they lose any data. Mainly focused on steps to enable disk’s controller in the Bios menu for gigabytes, Sony Vaio, Asus, Acer, Dell, and Samsung in Windows 11, 10, 8, 7, etc.
