Effortlessly Import PST Files to Office 365 – Using Four Secure & Fast Migration Solutions!


In this post, you will get to know the different solutions to import PST files to Office 365. You can choose either a free manual method or an expert-suggested utility. Read this write-up and follow the step-by-step solution for the same operation.
Nowadays, migration from desktop-based Outlook to Office 365 OWA has become a common thing. It’s because users are getting a wide range of functionalities & features over the cloud platform. The best one is, of course, Office 365. Most of the users are familiar with its interface and its application. Office 365 is just a web-based version of desktop Outlook with more features.
But, the problem is, it is not at all an easy task to import Outlook PST files to Outlook 365 if you don’t know the right approach. Therefore, to help users to make this task simple, we have written this technical post. This post will explain how to import PST files to Office 365 hassle-free and in no time.
Must Read:- Export address book from Outlook 2019
Know the Security & Data Risks of PST Files in Outlook!
While PST has mobility advantages, it also originates several security issues, and before moving to the import PST to Exchange Online task it is essential to know this. Such as;
- PST files aren’t designed to function as gigabyte email archives & due to this these files can easily get corrupted. Also, frequent data loss makes it even worse.
- In cases like power outages, PC crashes, or abrupt closing of PST disconnects it from the Outlook profile. As a result, it’s usually overlooked or lost, creating an orphaned PST.
- PST files contain emails and because of misplacement or restriction access, they are not properly retained which can lead to a legal issue if emails are required as digital evidence.
- Though one can password-protect a PST file, there are several programs available that can crack passwords which can put the user’s sensitive data at risk.
- Since PST files are an essential part of enterprises, it has become the favorite target for hackers to deploy ransomware for malicious purposes.
How to Resolve?
- Regularly back up PST files to avoid loss from corruption.
- Use the ScanPST tool to repair minor PST file corruptions effectively.
- Split large PST files to prevent data corruption and slowdowns.
- Use UPS to prevent shutdowns during power loss or interruptions.
- Enable automatic saving to reduce the risk of data corruption.
- Use Outlook Repair Tool to fix orphaned PST file issues.
- Use strong passwords and change them periodically to enhance security.
Therefore, above are some of the serious concerns that make us rethink keeping the PST files on the desktop. This is why IT experts around the globe suggest importing PST to Exchange Online.
Now, it leads to the below question.
How Can You Import PST Files to Office 365?
Microsoft provides two methods of manual approaches using which users can move PST files to the Outlook 365 clouds.
Apart from this, you can also use trusted and secure software for the same operation ensuring maximum security of data. All solutions are explained here:
- How to Transfer PST Files to Outlook 365 Using Professional Solution (MVP Verified)
- How to Migrate PST Files to Office 365 Drive Shipping Method (Time Taking)
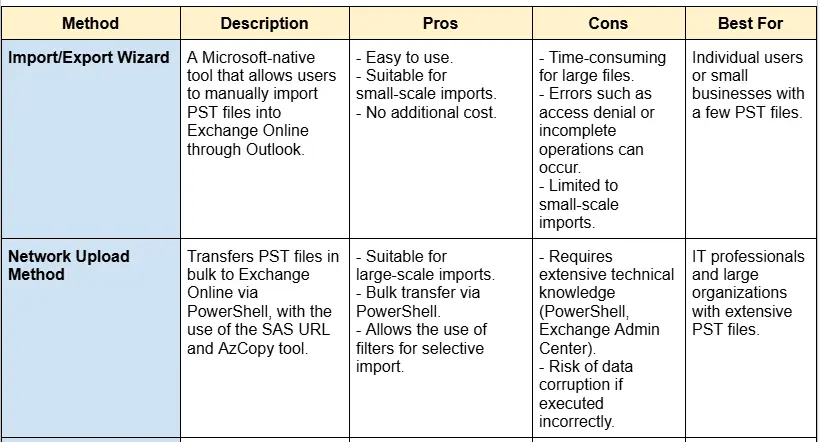
- How to Move PST File to Outlook 365 Network Upload Method (Confusing)
- How to Import PST to Exchange Online Via Import/Export Method (Error-Prone)
“Hello, I am Rachel. Recently, I bought an Office 365 subscription plan and created an account. However, there is no option to import PST files to Office 365 mailbox, like it was in the Outlook email client. I am not much of a technical user. Please guide me with a method to resolve how to import the Outlook 2010 PST file to Outlook 2019. Thanks in advance.”
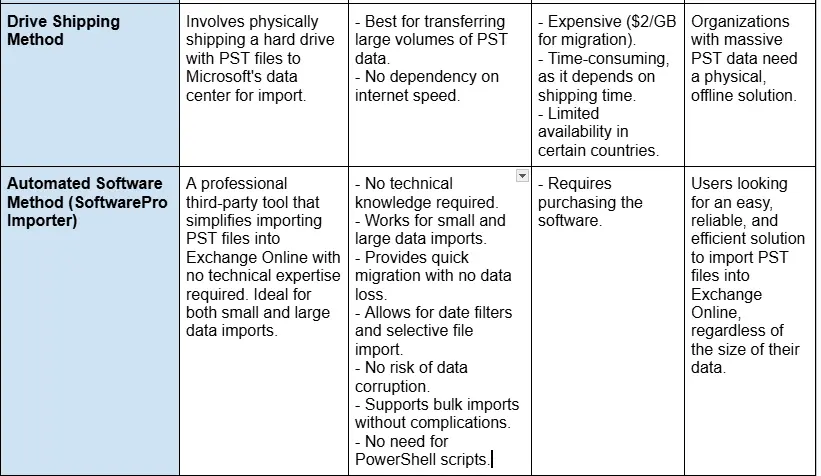
Method 1: Automated Way to Transfer PST Files to Outlook 365

The most trusted and verified software by Microsoft MVPs is Outlook Office 365 Import Tool. Try its free demo version of the application today!
It is the only solution that overcomes all the limitations of manual approaches. It supports migrating email, contacts, calendars, the tasks from PST files to Office 365 accounts. Also, capable of maintaining folder hierarchy throughout the process. This tool supports the Incremental Import approach which allows us to migrate only new or updated data from a PST file.
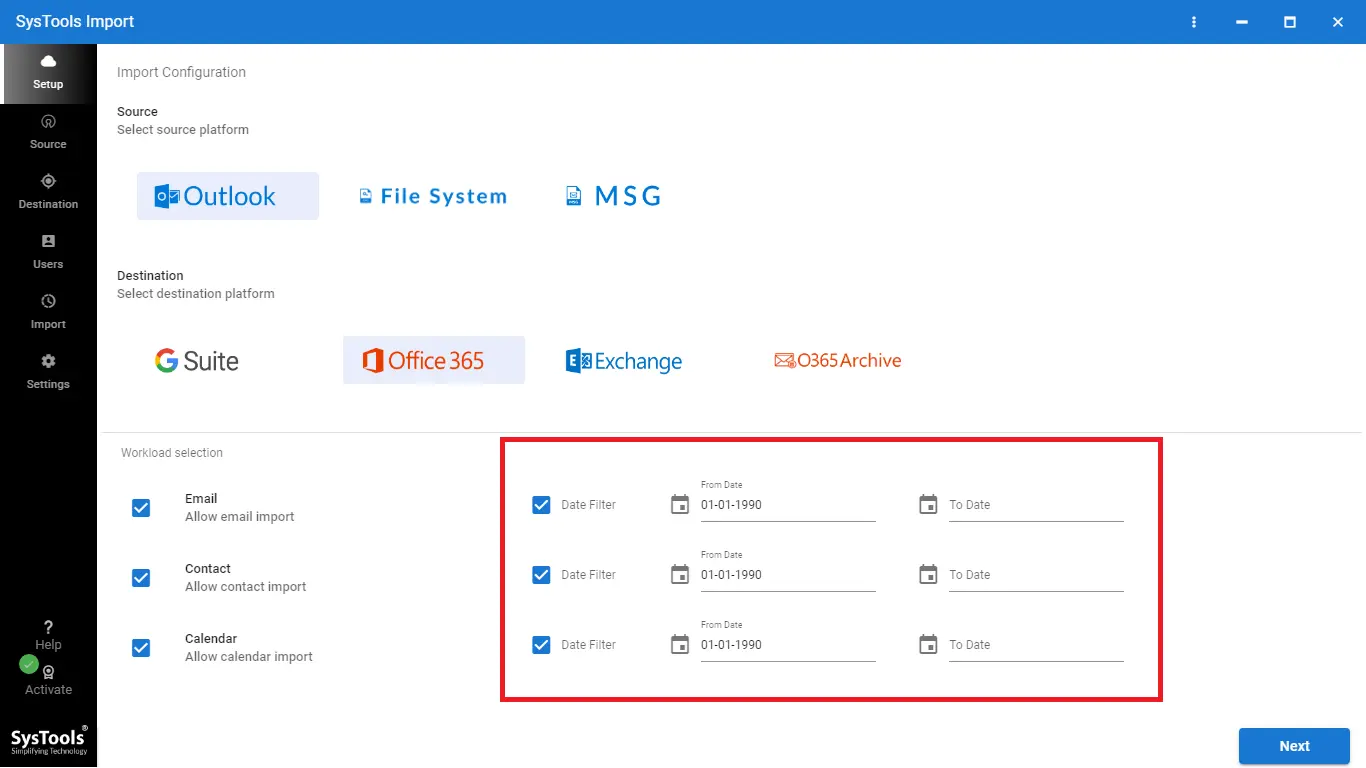
Moreover, the date filter is also available for the selective import of PST files to Office 365. Also, the software is available for all Windows Operating systems.
Steps to Move PST Files to Office 365
Follow the listed steps and quickly export/import Outlook Calendar to Office 365, emails, contacts, tasks, notes, etc.
Note: Login via Office 365 admin account if the user wishes to import Outlook PST files into multiple Office 365 accounts simultaneously.
Also, to import PST in Office 365 shared mailbox. Log in via User credentials to import multiple Outlook PST into your own Office 365 account.
Pre-Requisites to Import PST to Shared Mailbox in O365 Using Software
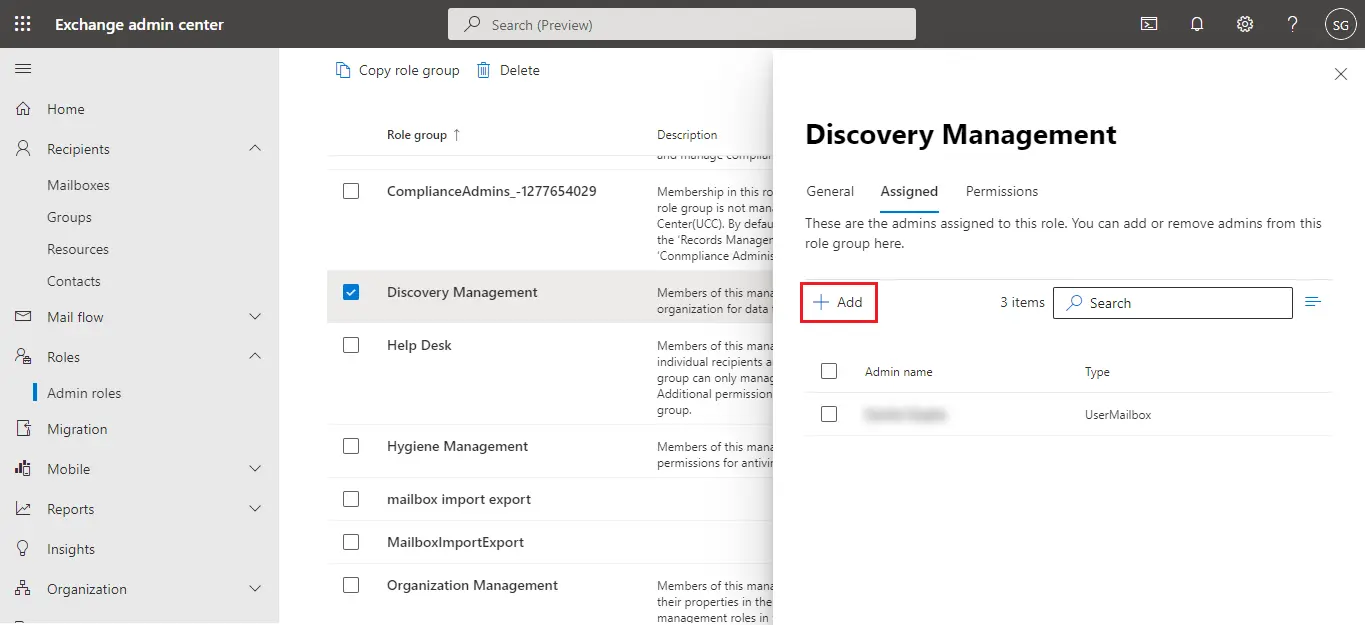
- Add Admin Impersonation Permissions in the Exchange Admin Center to import PST files to Office 365.
- Specify Mailbox Import Export Permissions to the Discovery Management Role Group.
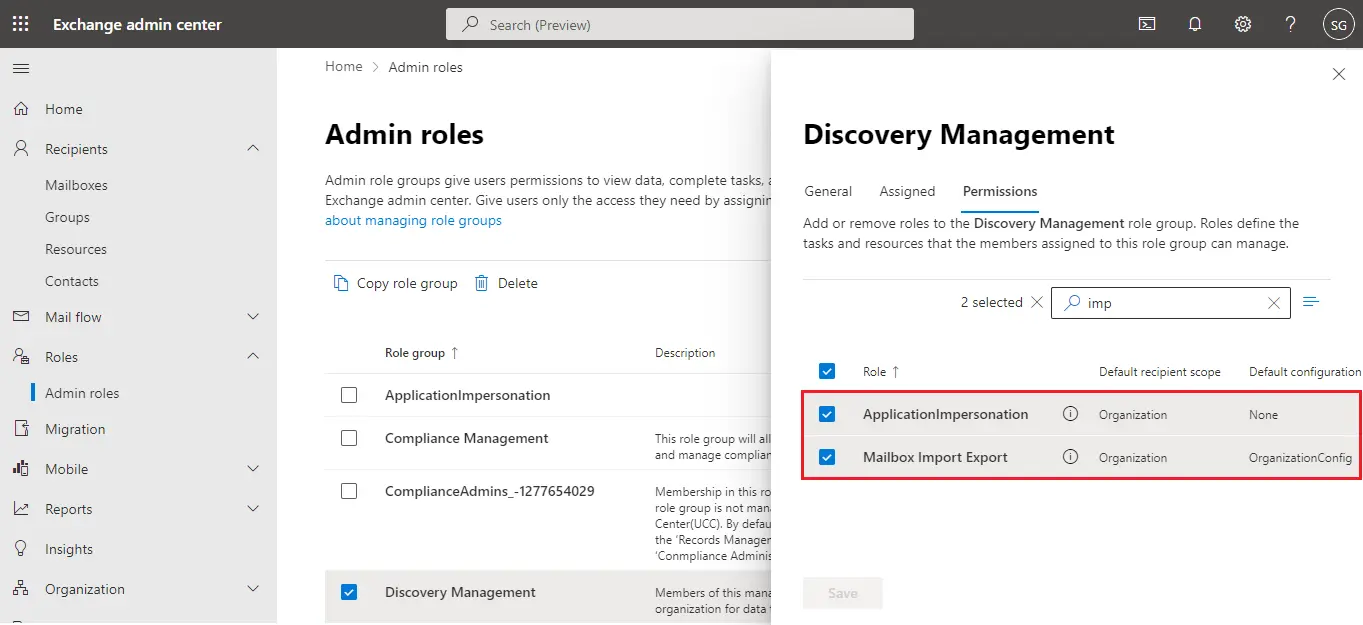
- Then Allocate UserMailbox Permissions to the Assigned Admin Account.
Now, after downloading the solution follow the stepwise instructions to initiate the task efficiently –
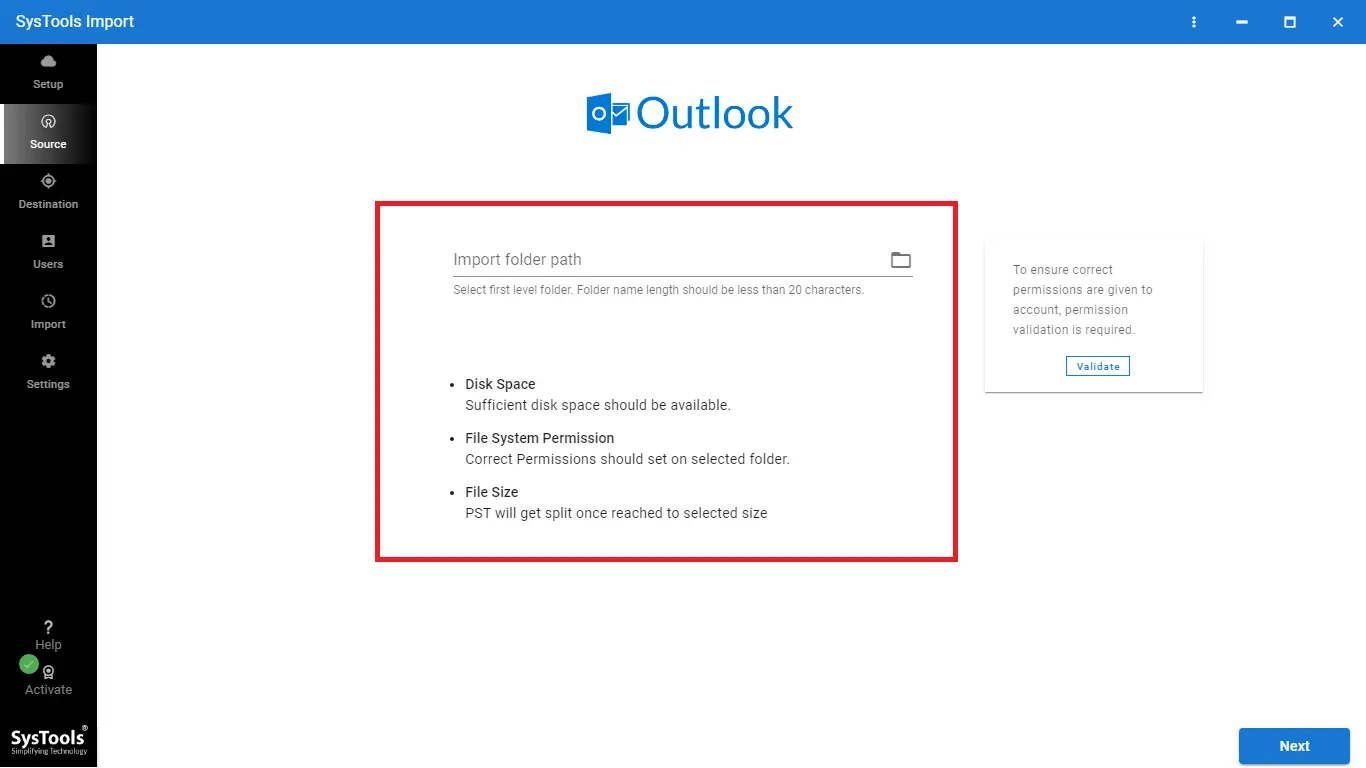
Step 1. Select the source (Outlook) & target (Office 365) platforms.
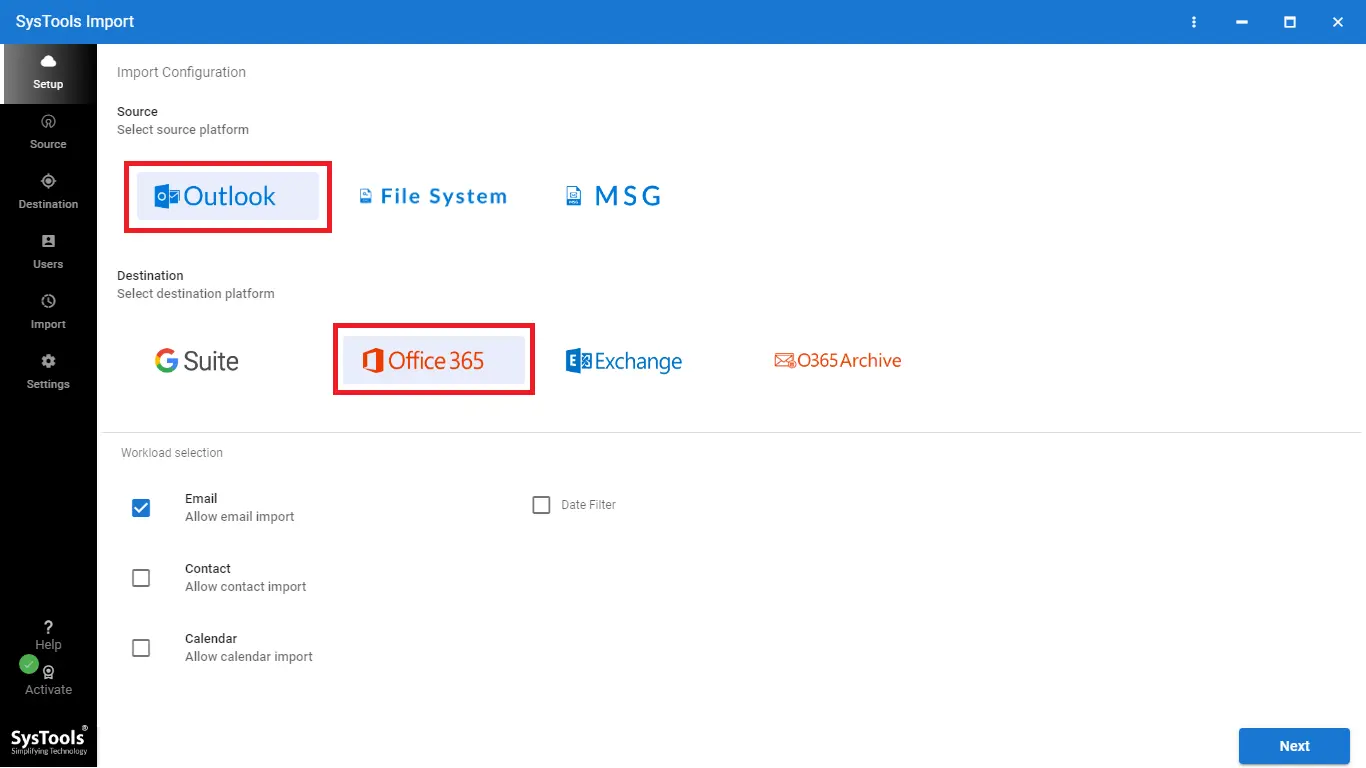
Step 2. Now, Select the Category of data you need to Import and Apply a filter for each selected category.
Step 3. Browse the PST files for the importing process & select the location as “Import Folder Path“.
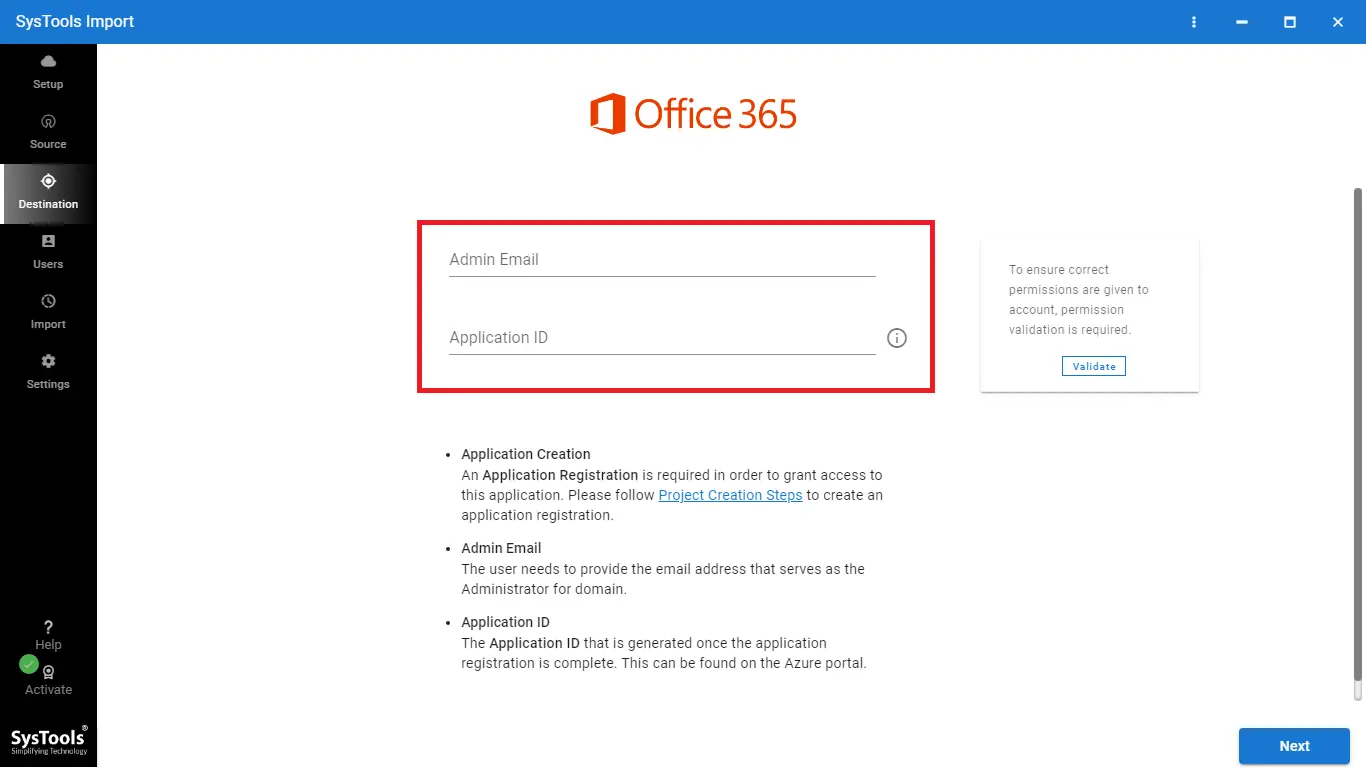
Step 4. Enter Office 365 Admin credentials for login.
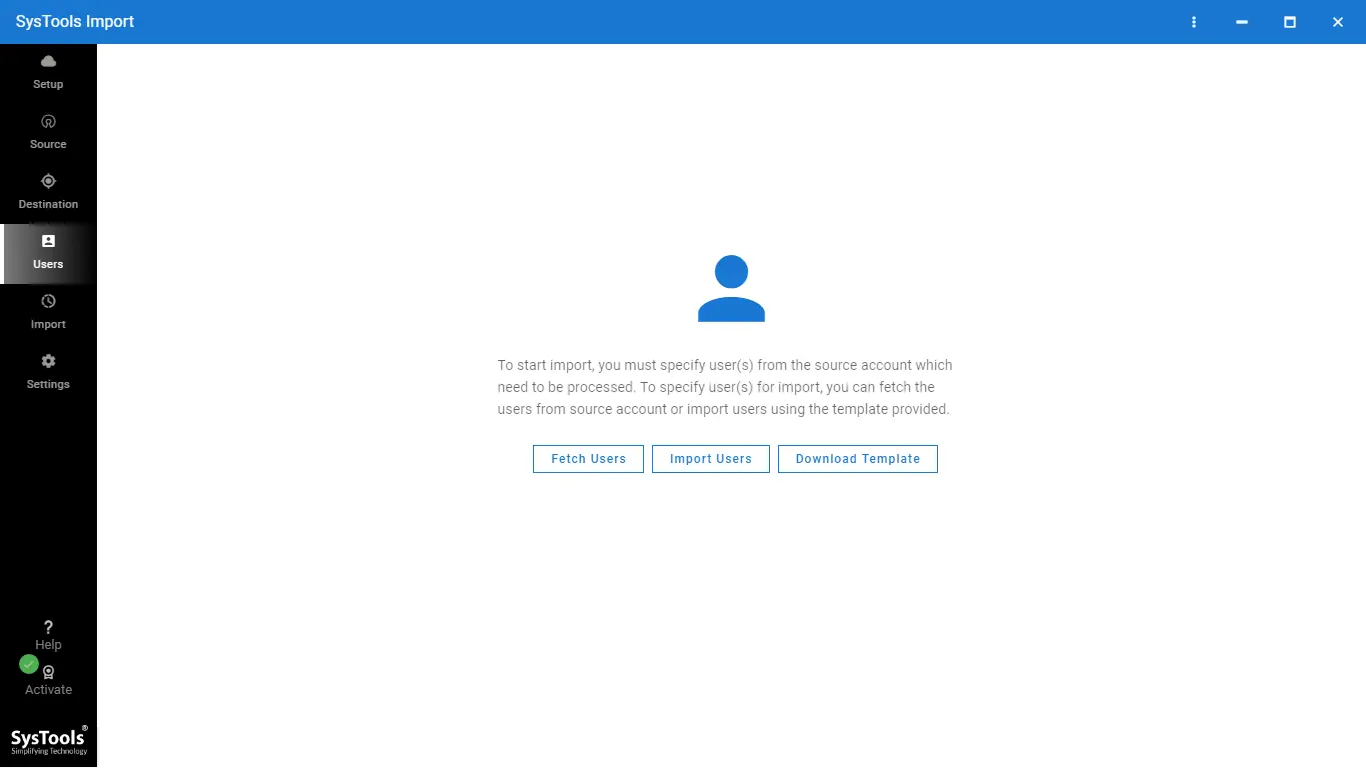
Step 5. Map each PST file with its destination client ID.
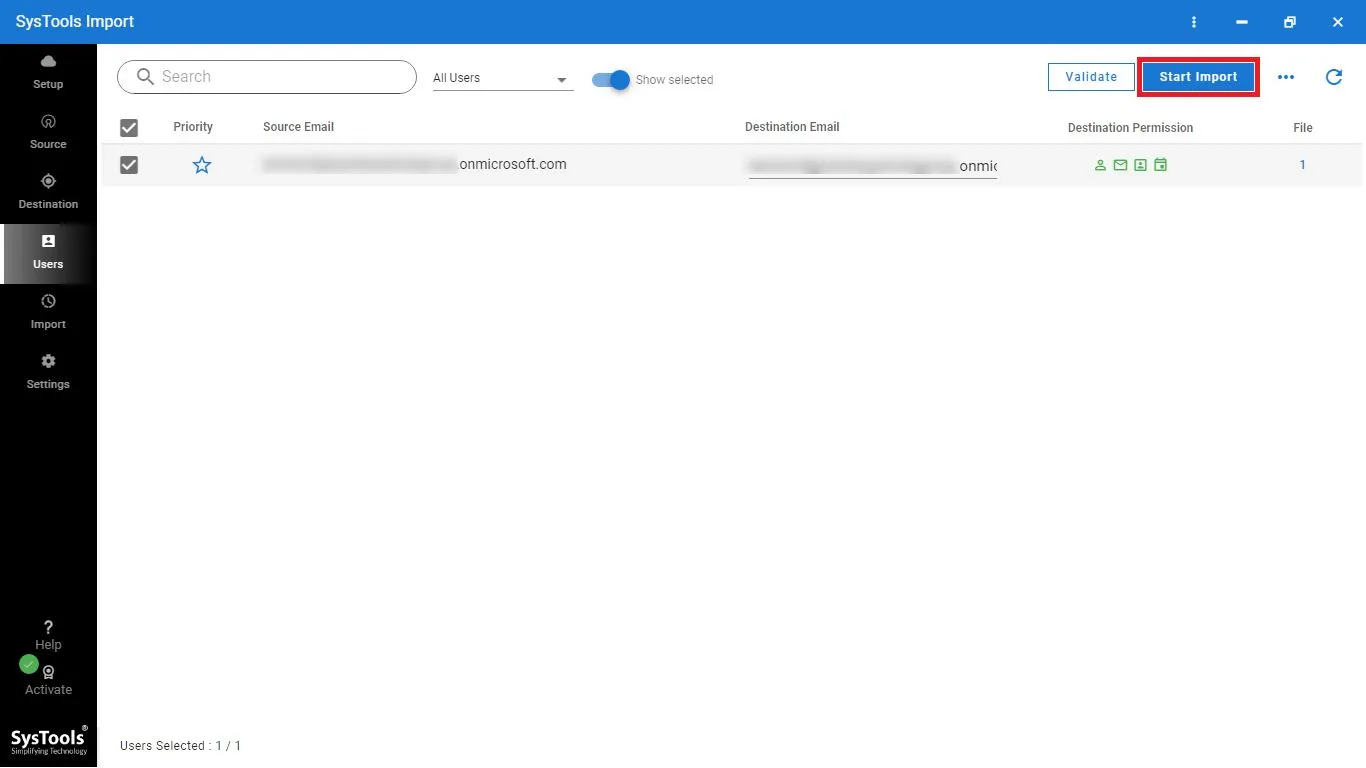
Step 6. Finally, Click on the Import button to start the import process.
Why Use This Utility Over Others?
- Import multiple PST files to the Office 365 mailbox quickly.
- Incremental import option to import new or updated files.
- Efficiently export Office 365 contacts to VCF or CSV formats.
- Allows to Import PST files to Office 365 shared mailbox.
- No file size limitation to moving Outlook data files to Office 365.
- Easily import large-size PST files to Office 365 users’ accounts.
- Support to Migrate Unicode and ANSI PST to Microsoft 365.
- Move Data File from Outlook 2019, 2016, 2013, 2010, 2007, etc.
Method 2: Import Outlook PST into Office 365 – Drive Shipping

The Drive Shipping Method is an expensive method which costs $2/GB. Additionally, it is ideal for large data transfers like in TBs. If you talk about its process then you have to copy files to a hard disc and physically ship them to the Microsoft facility center. After receiving your disc they will import them to your Exchange Online account which eliminates the need for long upload times over the internet.
Plus, they guarantee a 100% secure and reliable import PST to Exchange Online process without any data loss. However, this approach has downsides like high costs, limited availability, a time-consuming process, urgent projects, or regions where it’s unsupported.
Hence, it is clear that each manual methods have some serious flaws which make them unreliable. That’s when the role of the automated method comes in. It mitigates all the challenges of manual approaches. Let’s have a look at the automated method for moving the PST files.
Limitations Associated With the Drive Shipping Method
This method also has some downsides that must be considered before approaching this workaround to import PST files to Office 365.
- Currently, the Drive Shipping method is available in the United States, Australia, Canada, the Republic of Korea, Brazil, Japan, the United Kingdom, Southeast Asia, Europe, India, and East Asia.
- This method is available through the MS Enterprise Agreement (EA). It cannot be available via. Microsoft Products & Services Agreement (MPSA).
- The cost associated with the drive shipping method to upload a PST file Office 365 OWA is $2/GB of data. For example, if you ship 1 TB of PST files, the cost should be $2,000.
- A maximum of 10 hard drives can be shipped for an individual import job.
- A time-consuming procedure and data item of more than 150 MB will be skipped during the migration task.
- Users cannot import Outlook PST file that has 300 or greater than nested folders.
Method 3. Network Upload to Import PST Files to Office 365!
Use Network Upload to import Outlook PST files to Outlook 365. It is a free manual method. To use this process one requires high and sound technical skills.
This technique is very complicated and not reliable for non-technical users. But if you still want to use this technique, follow these below-mentioned steps to bulk import PST to Office 365.
In the Network Upload method, you have to perform 5 steps.
Know These Before Begin
- By default, the Mailbox Import Export role in Exchange Online is not assigned to any role group. You need to get this role. Use the Organization Management role group to assign Mailbox Import Export to your mailbox.
- Another way is to create a new role group, assign a Mailbox Import Export role, and then add yourself as a member.
- Apart from this, also you need to be assigned to the Mail Recipients role in Exchange Online which is by default assigned to Organization Management and Recipients Management role groups.
- Or to use Network Upload to import PST files to Office 365 you need to be a Global Administrator in your Office 365 organization.
Step 1: – Download the Azure AzCopy Tool & Copy SAS URL
- Open https://protection.office.com and log in to the Office 365 organization using Administrator account credentials.
- Go to the Security & Compliance Center and select Data Governance >> Import
- A new Import dialog box will appear, choose + New Import Job
- The New Import Job wizard will be displayed. Give a name to the Import Job and click Next
- Do, you want to upload or ship your data? Window hit on Upload your data and click on “Next“
- A new “Import Data” window will be displayed. You need to do two things here: Copy the SAS URL and Download & Install the Azure AzCopy Tool
- A pop-up will appear, choose Run to install the Office 365 Network Upload tool completely.
Note: Copy your SAS URL carefully in a text file as it is unique to your organization. You will need it later for transferring PST files to Office 365. Download Azure AzCopy version 7.1.0 only.
Step 2: – How to Transfer PST Files to Outlook 365
- Open your command prompt by typing “cmd” in the Run window
- Go to the directory location where you have installed Azure AzCopy.exe
- Perform the following command with the following syntax
AzCopy.exe /Source:<Location of PST files> /Dest:<SAS URL> /V:<Log file location> /Y
The actual command will be like this
AzCopy.exe /Source:”\\FILESERVER1\PSTs” /Dest:”https://3c3e5952a2764023ad14984.blob.core.windows.net/ingestiondata?sv=2012-02-12&se=9999-12-31T23%3A59%3A59Z&sr=c&si=IngestionSasForAzCopy201601121920498117&sig= Vt5S4hVzlzMcBkuH8bH711atBffdrOS72TlV1mNdORg%3D” /V:”c:\Users\Admin\Desktop\AzCopy1.log” /Y
Step 3: – Create a Mapping File of Imported PST
This is the most crucial step of the Network Upload method to import PST files to Office 365. After the complete upload of PST files to Azure Cloud Storage, create a CSV file that will specify the mapping of the PST files to which mailbox it is to be moved.
This CSV file will be required in the next step where you need to create an Import Job.
Step 4: – Create an Import Job in Office 365
- Log in to your Office 365 account and do the steps as shown in Step 1
- This time select the following options in the dialog box
- On the Import data page, select the following options
- Select the Mapping File option in the next window and choose “Validate“
- After successful validation, click on Save and finally select Close after the job is created
Step 5: – Filter and Start Import PST Files to Office 365 Job
- A window will be displayed, in the Security & Compliance center, and select Ready to import to Office 365
- On the flyout page, click Import to Office 365
- After clicking that, the filter of your data page will be displayed. You can easily apply filters according to your requirements and import your organization’s PST files to Office 365
Limitations of the Network Upload Method
- As you can see, the network upload method is quite complicated and lengthy to use. It requires high technical knowledge.
- The steps are too hectic and time-consuming. If the PST file size is more than 20 GB, then it will create a lot of issues.
- You have to save the PST file on the server or shared folder.
- To overcome that, we have come up with an extremely extraordinary solution for importing multiple PST files into Office 365 which is discussed in the next section.
Method 4. Use Outlook’s Import/Export Option
This is a straightforward method, users can use this solution when having data in small quantities to import PST files to Office 365. So, let’s start with its stepwise instructions –
- Navigate to the File option > Add Account.
- Provide the Office 365 webmail account > Connect.
- Now, enter the password > Sign In.
- Perform the prompts to set up an account.
- Afterward, run the Outlook app > File > Import/Export.
- Hit Import from another program or file > Next.
- Click on Outlook Data File (.pst) > Next.
- Now, find the PST files, by clicking on the Browse option.
- Lastly, select the folders of the files > Finish.
Limitations of the Import/Export Method
- Does not support a large volume of data
- Error-prone
- Time-consuming
- Need Outlook to be installed in your system, which is quite costly for some users.
- Risk of data loss
Comparison of PST Import Methods to Exchange Online!
Here is a comparison of these methods, which helps you to choose any of them to import PST to Exchange Online without having any doubt in mind:
Bottom Lines!
In this article, we have discussed three manual approaches that can import PST files to Office 365 mailbox. Due to the limitations of the Network Upload, Drive Shipping method, and Import/Export, we also discussed an automated solution. It overcomes all the downsides of manual approaches and moves Outlook PST into Office 365 in the minimum time of utilization. You can first try the free demo version of the tool which allows you to transfer 25 items per folder from a PST file into Office 365 OWA.
Common Queries!
1). Are there size limits for importing PST files into Exchange Online?
Yes, depending on the method you choose i.e.
- The Import/Export Wizard is not a practical approach for large files.
- The Network Upload Method supports large files, but several limitations are associated with this such as available storage and network speed.
- The specified automated solution can handle large files without limitations.
2). Can I import PST files selectively to Exchange Online?
Yes, you can selectively import PST files to Office 365 using the SoftwarePro Importer which allows you to filter data by date ranges, and exclude specific folders. However, Network Upload can also help in selective import using filters, but it requires technical steps which can be time-consuming & error-prone.
3). How do I resolve errors during PST import?
While initiating the importing task, several errors can occur like file corruption, incorrect permissions, or incomplete uploads. To resolve this:
- Solution 1 (software) handles most errors automatically during the process.
- Import/Export Wizard requires correct permissions and ensures no file corruption.
- Network Upload Method needs correct PowerShell commands for successful execution completion.
4). What are orphaned PST files, and how do they impact migration?
Orphaned PST files are when a PST file becomes disconnected from its associated Outlook profile. Various reasons are associated with the same such as user errors, crashes, or improper shutdowns. Due to the inaccessibility of orphaned or disconnected files, it is impossible to import them manually. Despite that, it doesn’t matter whether your PST is an orphan or not, using an automated solution will ensure a smooth migration.
5). What happens if a PST file has corrupted data?
It is suggested to first check whether your data is healthy or not using the ScanPST tool offered by Microsoft to save time and effort. Since importing corrupted data poses a data loss risk.
