Learn How to Archive Office 365 Emails Effortlessly!


Archiving Office 365 emails is an essential practice for businesses and individuals who are looking to manage their email storage efficiently. Implementing an effective archiving strategy will help to free up the space from the primary inbox. Additionally, archiving the data will add an extra security layer of security by safeguarding it against accidental deletion. However, most of the users didn’t know how to archive Office 365 emails, or how to automate this task.
Therefore, we made this guide to help users understand the process of archiving Office 365 emails, setting up automatic archiving, managing archive mailboxes, and accessing archived emails quickly. This means all the essential information related to the Office 365 archive mailbox you will get to know in this complete walkthrough. Let’s get started!
What is Archive Emails in Office 365?
Office 365 is a well-known and prominent email client that allows users to receive, and send emails. It comes with contribution plans that deliver extra benefits and increased storage space to subscribed users. Also, there is an instance of circumstances when the users of Office 365 need to archive Office 365 emails by date range to the external hard drive.
Archiving emails from commonly used email clients depends on various factors. The queries posted on Quora and Microsoft forums often revolve around mailbox size, the specific emails needed from a particular date range, and similar concerns.
“Hi, I am Rocky, and I have reached the storage space provided by Microsoft Office 365 for my account. Now, I am looking for a method to archive Office 365 account emails by date range to exclude the unnecessary emails from the archive folder of Office mailboxes.”
Why Archive Office 365 Emails?
Before starting with the procedure, it is essential to know what benefits are associated with this archiving emails in Office 365 task. If you know what they are, then you can skip this section. But if not, then go through these points:
- Storage: Whenever email data is stored on live servers, it can greatly reduce performance as the server gets fuller. The other option is to delete emails altogether not a wise option, since important data can be lost forever or stored elsewhere.
- Restoration: It depends on what backup solutions you already have in place, email archiving can speed up the process wherever your data needs to be restored. Therefore, the archived data takes up less space. In addition, recovering non-archived emails becomes faster and easier. Because the mail server’s data loss lessened.
- Compliance: Most industries require organizations to keep business records and since emails often contain such records, deleting them is not. There are certain industries like financial services, health care, and energy have even stern regulations about what business records must be kept.
Now, after knowing some common reasons. Let us move towards the solutions which help you to easily archive Office 365 emails. Here you get two approaches which are manual and automated solutions. Go one by one to perform these methods.
Also Read:- Add Office 365 Calendar to iPhone Calendar
How to Archive Emails in Office 365 Account?
In the following sections, we will learn the three different approaches for this task. Whether you are looking for a manual solution or an automated one, you will find it in the below sections:
Method 1. Manually Archive Office 365 Mailbox
We divided this technique into two stages first is Enable Archive Mailbox Office 365 and the second one is Auto Archive Outlook 365. Let us perform both stages to complete the task manually:
Stage 1: Enable Archive Mailbox Office 365
Firstly, users need to enable archive mailboxes by using the Security and Compliance Center. Follow the below steps for a good result:
- Download the Office 365 email client on your Windows system.
- Now, sign in by putting in your account credentials to proceed.
- Then, go to https://protection.office.com/.
- On the left side of the Security and Compliance Center, select Data Governance.
- Click on Archive to display the archive page.
- After that, on the Archive page, under the Archive Mailbox option, you can check whether the archive mailbox is enabled or not.
- Select numerous users, to archive the mailbox and click Enable in the details section.
- You will see a message on your screen with a warning. Click Yes to proceed.
- This process might take some time. To update the info in the Details segment, click on Refresh.
These steps will enable the archive mailbox in Outlook. Therefore, move to the next stage to archive emails from Office 365.
Stage 2: Auto Archive Outlook 365 Manually
You can also check the ways to archive Office 365 emails to a desktop, here:
- Open your Office 365 email account again.
- Now, find and click on the folder to archive emails from the selected folder.
- Then, pick the preferred emails and right-click on them.
- A drop-down menu will emerge. Now, click on the Archive option from the displayed menu.
- After that, you can also choose the emails from the delete group followed by right-clicking on emails. Then, opt for the Archive option from the drop-down menu.
So, the above process is workable and provides results. Also, there are some restrictions for using manual tricks for performing auto-archive Outlook 365. Let us see some disadvantages in the below section.
Method 2. Using PowerShell to Automatically Enable/Disable Archive Mailboxes
PowerShell is an automated method that enables or disables archive functions. Remember, this technique needs some technicalities to proceed with –
Prerequisites to Archive Office 365 Emails –
- An Exchange Online subscription.
- PowerShell installed on your local computer.
- The Exchange Online PowerShell module was installed and configured.
Connecting to Exchange Online PowerShell –
- Search for “PowerShell” and select the “PowerShell” application.
- Open Windows Terminal and create a new tab with PowerShell.
- Connect to Exchange Online:
Connect-ExchangeOnline
- Enter your Exchange Online credentials when prompted.
Enabling Archive Mailboxes for Individual Users –
- Identify the user:
Replace <user_email> with the actual email address of the user.
- Enable the archive:
Enable-Mailbox -Identity <user_email> -Archive
Enabling Archive Mailboxes for All Users –
- Identify all users to archive Office 365 emails:
Get-Mailbox -Filter {ArchiveGuid -Eq "00000000-0000-0000-0000-000000000000" -AND RecipientTypeDetails -Eq "UserMailbox"} ```
- Enable archives for all users:
Get-Mailbox -Filter {ArchiveGuid -Eq "00000000-0000-0000-0000-000000000000" -AND RecipientTypeDetails -Eq "UserMailbox"} | Enable-Mailbox -Archive
Disabling Archive Mailboxes for Individual Users –
- Identify the user:
Replace <user_email> with the actual email address of the user.
- Disable the archive:
Disable-Mailbox -Identity <user_email> -Archive
Disabling Archive Mailboxes for All Users –
- Identify all users with archives:
Get-Mailbox -Filter {ArchiveGuid -Ne "00000000-0000-0000-0000-000000000000" -AND RecipientTypeDetails -Eq "UserMailbox"}
- Disable archives for all users:
Get-Mailbox -Filter {ArchiveGuid -Ne "00000000-0000-0000-0000-000000000000" -AND RecipientTypeDetails -Eq "UserMailbox"} | Disable-Mailbox -Archive
Verify the status of the archive mailboxes by using the Get-Mailbox cmdlet commands.
Disadvantages of Archive Office 365 Emails
There are some shortcomings in using manual methods to archive emails in Office 365. Follow the below steps:
- It supports archiving Office 365 mails by date range.
- These steps required an in-depth understanding of Office 365. Users can also need technical skills to complete the process.
- Therefore, it only guarantees data security during part of the procedure.
These are completely manual methods with their limitations in archiving Office 365 emails. The above method is not perfect for a non-technical person and creates multiple difficulties for users. So, we just recommended you go with the below solution which is very helpful for all users.
Without wasting the user’s time. Let us move to the professional solution which provides the resultant result to its users.
Method 3. Expert Recommended Solution
In the above sections, we learn about all the possible manual methods which are easy but, create some difficulties for naive users. As manually it takes lots of user time & effort to archive Office 365 emails. So, to automate the task and save your crucial time opt for Office 365 Account Backup Tool to archive multiple Office 365 emails simultaneously.
If any doubt, try this solution for free and see its efficiency and performance.
It helps you to archive emails from Office 365 to MBOX, EML, PST, HTML, CSV, EMLX, MSG, and TXT formats. Additionally, it preserves data integrity throughout the archiving process. Both technical and non-technical users can easily use this tool because of its self-explanatory UI.
Step-by-Step Process of the Software
Following are the quick steps to archive Office 365 emails using automated software. Go step by step to complete the task efficiently:
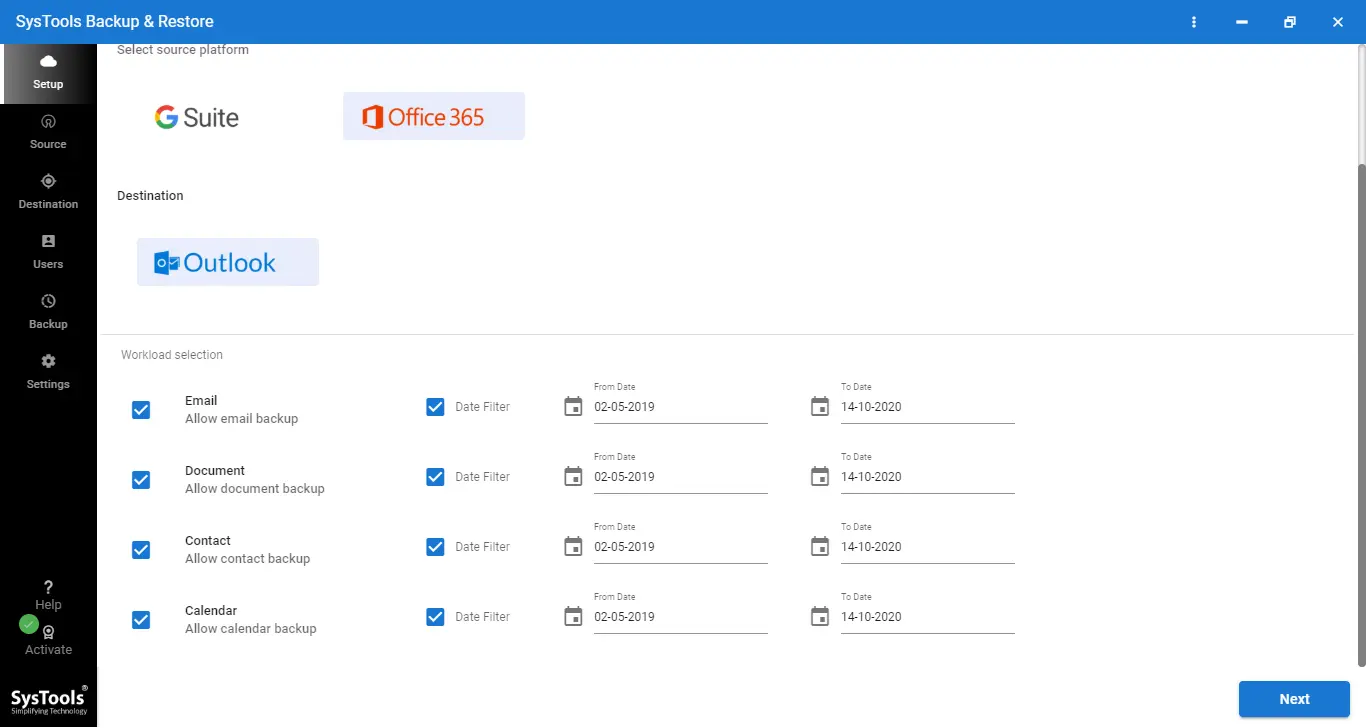
Step 1: Run the software, and select the source (Office 365) & destination (Outlook) platform.
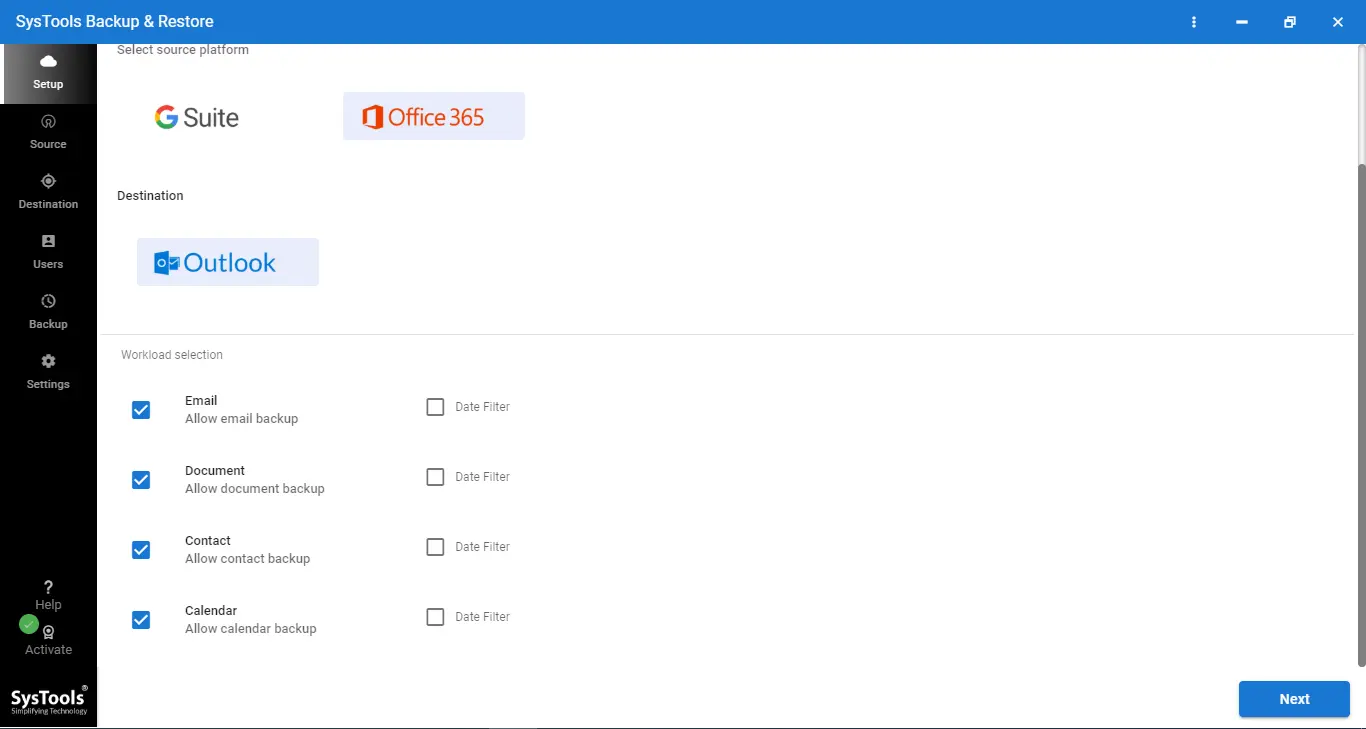
Step 2: Select Office 365 Categories to archive emails.
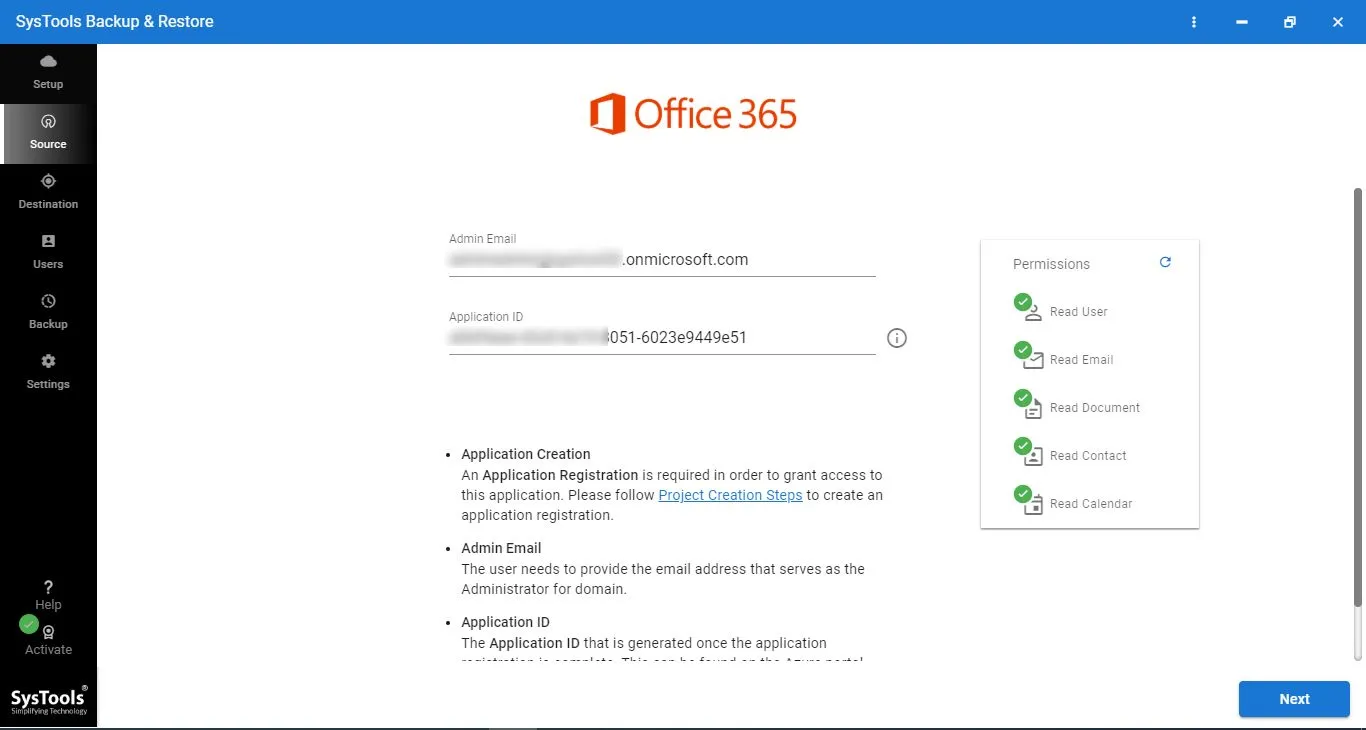
Step 3: Now, enter Admin Email ID and Application ID.
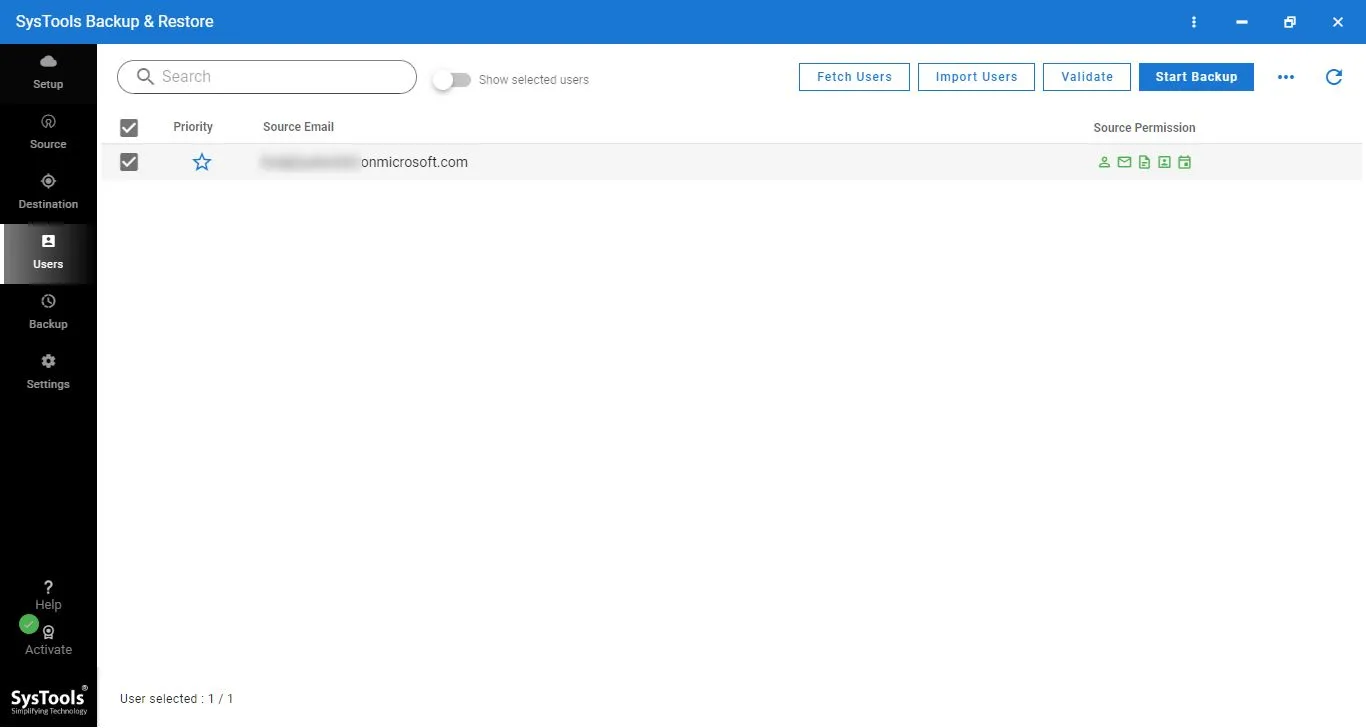
Step 4: Finally, archive emails in Office 365 by clicking on the Backup option.
I hope you get your answer after performing the professional solution. This tool is very helpful for new beginners as well as technical & non-technical person as well. Moreover, there is no file size limitation to using this utility. Now, you can choose as per your requirements.
How to Turn off AutoArchive in Office 365?
For any reason, if you want to disable your archive settings then go through these points -:
- Go to File > Options > Advanced.
- Scroll down to the AutoArchive section.
- Uncheck the Run AutoArchive every n days checkbox.
- Click OK to save your changes.
Observational Verdict!
Now, we have a clear insight about the archive Office 365 emails procedure. We explored both manual and automated solutions for the same. Among them, we recommended automated software that provides desired results without limitations. Any user can effortlessly perform this task using this tool. To know the utility in more detail one can download it for free, and start using it. If satisfied with its features and performance, buy its full version which is cost-effective as compared to other solutions like this. I hope from now on, you will not face any issues when archiving emails in Office 365.
