How to Remove Write Protection from External Hard Drive?


Is your external hard drive or other drive refusing to write anything on it? Or is it showing the message that ‘disk is write protected’? Actually, the write protection signifies that one can only view the data items stored on the external drive but is not able to perform any modifications to them. Users who do not know how to disable write permission should follow this article carefully. In this post, users will find out the various solutions that can remove write protection from external hard drives on Windows 11, 10, 8, and 7.
“Please help me! My friend gave me its hard drive, which consists of a school project. But when I was trying to perform any action on the drive, it kept showing that the disk had a write-protected message. I asked the same question to my friend, and he does not know how to remove write protection from hard drive. Now, I am in trouble! If anyone knows the resolving solution, then please suggest to me how to disable write protection from hard drive.”
Methods to Remove Write Protection from External Hard Drive
In the following sections, users can learn about the different workarounds that help erase the write protection from an external hard disk drive. The method is divided into two parts: the first section describes the procedure to eliminate write protection and the second step provides the solution to remove folder.exe from pen drive. The write permission can be easily disabled from the hard drive by using the following approaches in Windows 11, 10, 8, and 7.
Best Methods to Secure Data from Any Disaster
In order to get back the data from the drive that was lost during the removal of write permission, take help from the Hard Disk Recovery Wizard. It is an adept tool that recovers shift+delete, formatted, and missing data from internal as well as external storage devices.
It allows the users to detect a pen drive detected but not showing data within four simple steps:
- Plug in the external hard drive into the system.
- After that, run the software on your Windows PC.
- Next, select the drive from the tool interface and scan it.
- Once the scan process is completed, all the deleted files will be displayed on the software panel.
- Now, click on Save to download all the files on the local system.
#1: Use a Physical Switch to Disable Write Protection from Hard Drive
To prevent USB sticks or memory cards, some of the manufacturing companies put a switch on them. In this situation, when the flash drive is locked, the write protection automatically turns on that device. The users can easily unlock SD card with the help of a physical switch, as shown below:
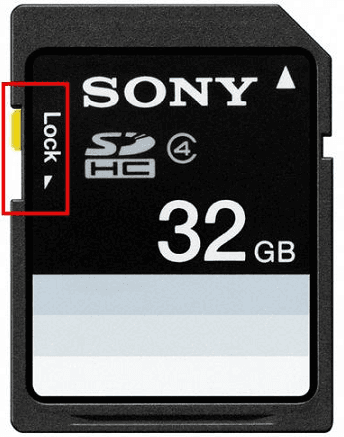
Note: This method can be applied to an SD card or flash drive in order to eliminate write protection. With the help of this, users will not lose the data of flash drive.
#2: Remove Write Protection from External Hard Drive via CMD
This workaround can be used for external hard drives as well as USB flash drives. Follow the below instructions to eliminate the write protection easily on Windows 11, 10, 8, 7, etc.
- Click on the Windows icon and type Run in the text bar.
- Once the Run dialog box opens, write ‘cmd’ in the bar and hit the Enter key.
- In Command Prompt, execute the ‘diskpart’ command and press Enter.
- Once the above command executes successfully, type list disk and press Enter. (Tip: Always keep in mind the disk number of write-protected the external hard drive in Windows 10.)
- Now, write the number of the write-protected hard drive in cmd, such as disk 1 and hit Enter key.
- In order to remove the write permission, execute attributes disk clear readonly in the command prompt.
Limitation: This workaround disables write protection on the hard drive but results in data loss that is saved on the drive. In this, you have to get back deleted files from Windows 10.
# 3: Use Registry Editor to Remove Write Protection from Hard Drive
It is suggested to follow the below instructions carefully because any mistake in the registry can result in data loss. Now, go through the below steps sequentially to remove write protection from the hard disk in Windows 7, 8, and 10:
- Plug-in external hard drive that is write-protected by the system.
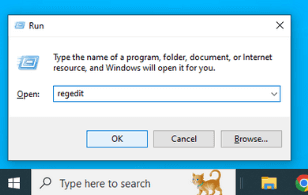
- Press Win+R to open the Run dialog box.
- Type ‘regedit’ in the text bar and click OK to open the registry.
- Next, right-click on HKEY_LOCAL_MACHINE and then click on Expand.
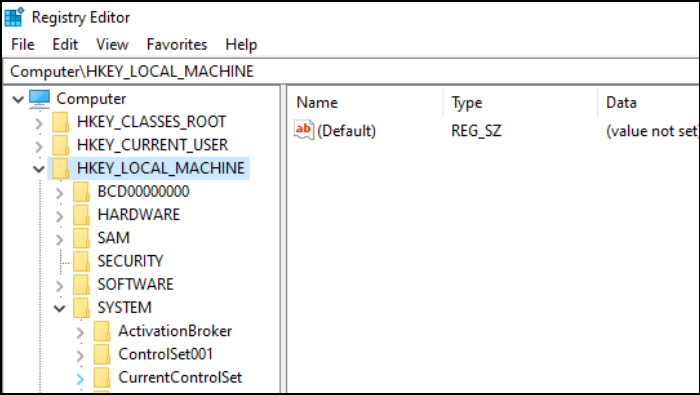
- After that, click on the Current Control Set from the system list. Then, you have to click on Control.
- Now, you need to check the storage device policies. Modify the DWORD value with ‘0’ and click OK.
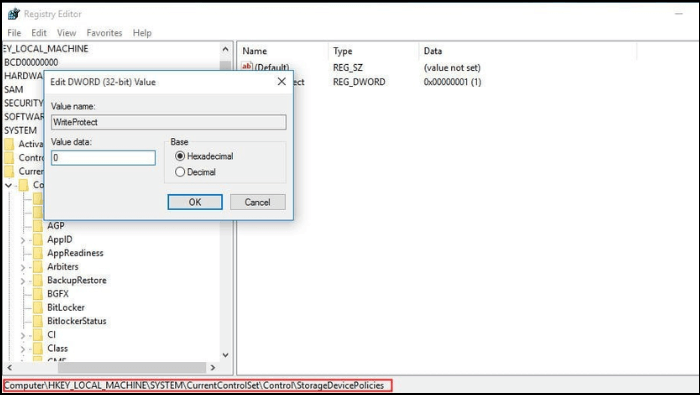
- Close the Regedit window and reboot the system.
#4: Use BitLocker to Disable Write Protection from External Hard Drive
Most of the time, users use the BitLocker partition on their hard drive. Its function is to protect the data items with the help of an encryption feature. But users cannot make any changes to the BitLocker partition until it is disabled. Go through the mentioned steps to unlock the BitLocker and remove the write protection from the hard disk drive easily:
- The first step is to right-click on the BitLocker volume and select the Manage BitLocker option for it.
- Next, you need to choose the correct partition that is write-protected, and then click on the Turn Off BitLocker option.
- Just wait for some time until BitLocker decrypts.
Final Thoughts
The problem that the hard drive is write-protected can be easily removed by the above-described workarounds. After removing write protections, many times data can be deleted from the drive. I hope that you have a valid solution of your query how to remove write protection from external hard drive Windows 11, 10, 8, 7, etc. If you have issues, then feel free to contact us.
Questions and Answers (FAQs)
1. Why is my external hard drive write-protected?
Ans: There are multiple reasons why an external hard drive may become write-protected:
- Physical Switch: Some external hard drives have a physical switch that locks the drive in a write-protected state.
- File System Problem: Corruption or error with the drive’s file system can trigger write protection.
- Security Setup: A Few hard disks are designed with a built-in security feature that stops accidental deletion or modification of files.
- Registry Settings for Windows: If there are specific registry entries set to enable write protection, it may prevent the user from writing to the drive.
2. How to delete write protection using Diskpart in Windows?
Ans: You can use the Diskpart tool to remove write protection:
- Open Command Prompt as an administrator (cmd).
- Type diskpart and press Enter.
- Enter list disk to show all connected drives.
- Recognize your external hard drive by its size, then type choose disk X (replace “X” with your driver’s number).
- Type attributes drive clear read-only to remove the write protection.
- Type exit to close Diskpart, then check if the issue is resolved.
