How to Mount and Unmount Your VHD / VHDX File in Windows Explorer? Best Technique


Summary: This blog describes virtual hard disks (VHDs), their types (VHD and VHDX), and how to map them. It explains how to mount and unmount VHD/VHDX files in Windows Explorer using multiple techniques and also recommends using “VHD Recovery” to recover data from a damaged VHD.
VHD and VHDX both represent a virtual hard drive. VHD may consist of what is stored on a physical HDD, such as a file system and disk partitions, which successively include files and folders. Despite that, users get confused that how to implement the procedure to attach and detach a VHD.
So, we considered this query and come up with this reliable article. Today! In this guide, we will disclose the free solution to resolve the user’s issue, such as how to mount and unmount your VHD / VHDX file without any hassle.
Before proceeding further initially, go through the below-explained methods to mount-VHD is not recognized in Windows file explorer. Also, here you will get proper guidance on how to unmount the.vhdx or.vhd file in Windows Explorer.
People Also Searching!
- How to Mount VHDX File in Windows 10
- Mount-VHD is not recognized?
- Free Solution to Mount VHD / VHDX
- Mount VHD Windows 10 Command Line
- How to Unmount A VHD File in Windows 10?
Here in this blog, you will find a verified solution for all these queries. Below you will find the stress-free solution to mount either VHD or VHDX files into Windows Explorer on Windows 11, 10, 8, 7, etc. Also, with this, you will find the complete guide for how to unmount either.vhdx or.vhd files. Simply perform the steps listed below.
Methods to Mount and Unmount VHD/VHDX Files in Windows
Here, in this segment, we are going to mention the free method to permanently attach and detach VHD and VHDX. Mainly, this manual method is obtainable in multiple ways. All the techniques are discussed appropriately.
However, you can follow any of them to implement the procedure of mounting and unmounting VHD in Windows. Let’s get going:
Manual Ways to Mount or Unmount VHD or VHDX File in Windows 10
Follow the below-stated directions to execute the process of VHD or VHDX mounting in Windows. Let’s move to mounting VHD files on Windows 10, 8, 7, etc.
Note: If you have not found files in the VHDX file, try this VHDX Data Recovery Software to resolve the inaccessibility.
#1: Attach VHD/VHDX to File in Windows Explorer
- Initially, to mount VHD/VHDX file, right-click on the VHD file and choose the Mount option.
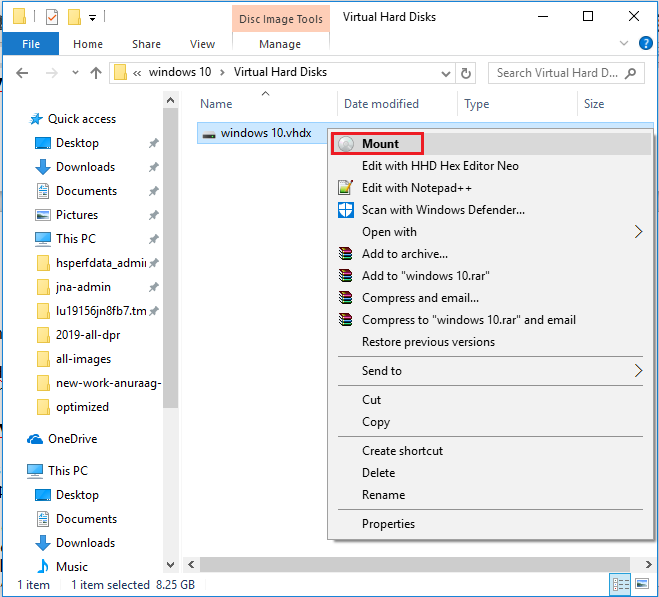
- Now, the VHD drive will be loaded to This PC / My Computer. So, you can easily copy and paste or access the preferred data from the disk.
#2: Mount and Unmount VHD/VHDX Files Using Disk Management in Windows
With the help of disk management, you can easily mount or unmount VHD or VHDX file in Windows 10. To do so, follow the below-listed steps sequentially:
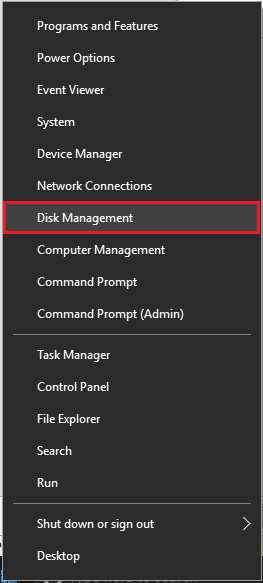
- First of all, go to Windows start and right-click on This. Then, click on Disk Management.
- Now, from Disk Management, click on Action from the menu, and click on Attach VHD. After that, browse the .vhd files on your system.
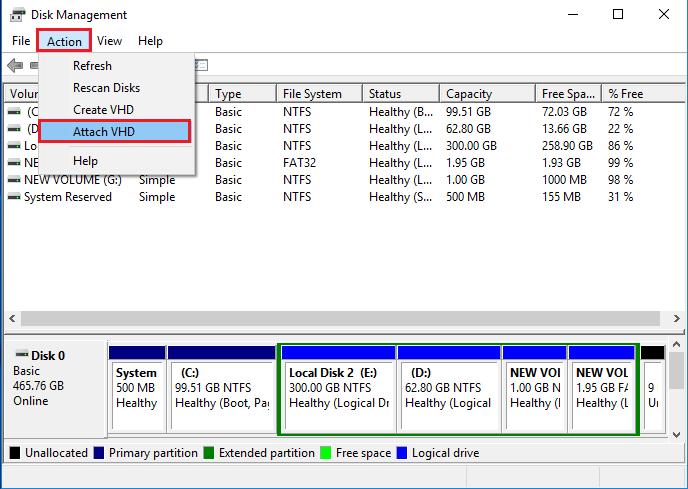
- Wait for a few minutes, your VHD will be attached.
If you are not able to find the disk management utility in File Explorer,. So, you can follow the below-listed steps to attach VHD.
- Firstly, click on Windows + R key and type diskmgmt.msc in the search box to open the Disk Management dialog box. After that, expand the action menu to proceed further.
- After that, expand the Action menu and choose Attach VHD option to proceed further.
- Here, hit the Browse button to load the VHD or VHDX file, depending on which one is to be mounted. And click on OK.
- Finally, the desired VHD file will be mounted successfully
#3: Mount and Unmount Your VHD / VHDX File with Command Prompt (CMD)
- Press Win+X keys altogether, and select Command Prompt (Admin) mode.
- Now, in cmd wizard, you have to type diskpart and press the Enter key.
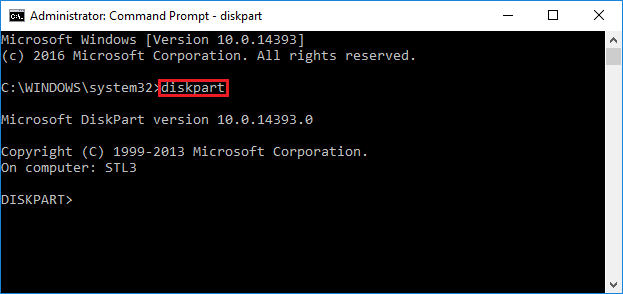
- Here, type the Select disk file=“location of VHD file” command to choose the VHD/VHDX file by indicating its location. After that, hit Enter to proceed ahead.
- Lastly, type attach vdisk and hit Enter to mount the VHD/VHDX file.
#4: Utilizing Powershell Utility to Attach VHD or VHDX File to Windows
This workaround is for those users who are working with Windows 10/8/7 and Windows Server 2016/2012/2008. To mount VHD/VHDX files, you can use this Windows PowerShell cmdlet. Follow the below-stated steps for the same:
- Primarily, run PowerShell cmdlet as Admin
- Afterward, type Mount-DiskImage -ImagePath “location of VHD file” commands to attach the VHD
Note: To mount a Hyper-V.vhd or.vhdx, you might get an error message such as mount-VHD is not recognized as the name of a cmdlet. Here, you have to add Hyper-V Module for Windows PowerShell to your server. After doing this, you can easily copy the required data from VHD file to any disk drive normally. Subsequently, you can detach the VHD drive when you are done. However, in this upcoming segment, we mentioned the methods to unmount VHD in Windows.
Methods to Unmount VHD/VHDX in Windows Manually
Here, in this segment, you will get the different solutions to unmount VHD/VHDX in Windows 10, 8, 7, and below OS. Simply, follow the below-outlined steps for the same.
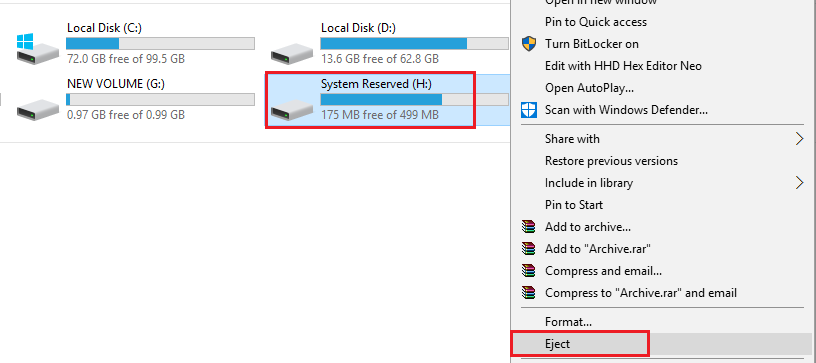
#1: Detach VHD/VHDX File in Windows Explorer
- Navigate to the New Volume or drive and then right-click on it.
- Then, choose Eject to successfully unmount VHD drive.
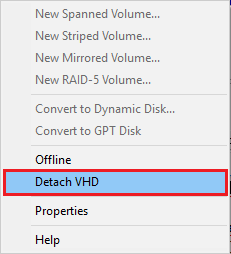
#2: Unmount VHD / VHDX Using Disk Management in Windows
- Press Win+X keys and then, select Disk Management.
- Additionally, to unmount the VHD/VHDX file, right-click on the added virtual disk and click on the Detach VHD option.
#3: Unmount VHD/VHDX File Using Command Prompt
- At first, press Win+X keys and hit on Command Prompt as Administrator.
- Now, type diskpart in cmd and press the Enter key.
- Lastly, type detach disk and press Enter to unmount a VHD file.
#4: Dismount VHD Utilizing Powershell Utility
- You have to launch PowerShell cmdlet as Admin.
- After that, type this Dismount-DiskImage-ImagePath “location of VHD file” command to unmount the virtual hard disk.
Notable Tip! Recover your VHD Data
If you lose your crucial data from VHD and VHDX files after implementing the above-stated manual ways to mount or unmount VHD or VHDX file in Windows 10, 8, 7 and 11 or in any other circumstances,. At times, you need an instant way to fix this issue. So, do not worry! Using this Hyper-V File Recovery software,
- Download and install VHD file recovery software.
- Find the .vhd file in the software.
- Select a quick or advanced search.
- Save the recovered VHD file data to the desired location.
This program helps to recover .vhd files formatted in NTFS or FAT file systems. VHD data recovery software is capable of recovering both dynamic and static VHD files. with this utility, you can easily recover corrupted .vhd and vhdx files.
Concluding Words
Hopefully, you will get rid of your issue, such as how to mount and unmount your VHD / VHDX file in Windows Explorer, after reading this entire write-up. Mainly, we had mentioned the stress-free techniques to mount and unmount VHD/VHDX files in Windows 10, 8, and 7. All the methods to attach and detach VHD and VHDX are discussed efficiently. So, you can implement anyone as per your necessity.
Questions and Answers by Users
Q: Can VHD file recovery software work on a Windows 10?
Yes, this software is compatible with all versions of the Windows operating system, including version 10 and above. This also works in the Windows 11 environment.
Q: How do I mount VHDX files on Windows 10?
Yes, you can use the above blog to mount VHDX files on Windows 10.
Q: What is the utmost size of a VHDX file?
The maximum VHDX file size is 64 TB. If VHDX file data is deleted due to any error, you can try VHD recovery software without any hesitation. This software can recover an unlimited amount of data with no file size limitation.
